
 Do you ever have a pattern speak to you when you see it?
Me! Me! Me! Sew me next! Sew me next! Pick me! Pick me!
Well, this pattern did not just speak to me, it screamed at me!
The minute I saw this free vest pattern on the internet, I abandoned all of my other sewing plans.
Since I could not ignore its request to be sewn next, a boy’s vest became my next sewing project.

 What caught my attention about this vest pattern was the endless creative possibilities that it presented.
From the fabric I would use to make this vest, to the type of pockets I would sew, to the embroidery and details I would stitch, there were dozens of designs decisions to be made.
First off, I picked the fabric. I choose some sport weight scraps for the outer layer of this vest and some flannel for the lining.
I did question using flannel for the lining though.
The smooth slippery fabric of a lining helps with taking an item on and off. Flannel is not smooth or slippery and would actually make it more difficult to pull an item on and off.
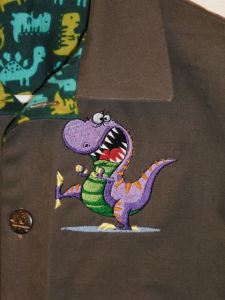
But, since this is a vest, i.e. without sleeves, I figured the flannel would be fine to use. Plus, it would add a layer of warmth to the vest, and as an added bonus, I would be using some of the flannel hiding in the stash and most importantly, I could incorporate the print of the flannel with the embroidery design that I would be stitching on it. So, it was not difficult to pick the dinosaur flannel fabric for the lining and a dinosaur embroidery design.

 When it came to deciding on pockets, I liked the patch pockets that were used on the pattern so I decided to make them.
The pockets are not just typical patch pockets so there would probably be something new for me to learn from sewing them.
I started the process by downloading the pattern, printing it out, taping it together, cutting it out, and then throwing it away. Yes, you read that right. I threw it away.

 As I laid the pattern pieces on the fabric, I did not like the way they looked at all. I couldn’t get the shoulder seams to match and the armscye looked misshaped.
I could see many problems occurring during the sewing process using that pattern and I did not want to waste my time or fabric on a doomed project.
I was disappointed to say the least.
I was so excited to make this vest and I had already put so much planning into it’s design that I did not want to just abandon the project.
So I turned to my pattern stash and what do you know! Lying right on top was a jacket pattern, Simplicity 8902.
Could I possibly use this jacket pattern to make a vest by just leave the sleeves off?
 I did not know the answer to this question but I was certainly willing to find out.
I began to cut out the pieces for this vest from it. Since I was going to use buttons instead of a zipper, I added an extra 1 inch to the front pieces.
I also ironed on a strip of interfacing to this extra inch to strengthen it for the buttons.
My first step in the sewing process was to sew the pockets on the front of the vest.
Embroidering the dinosaur design was next. Then I sewed the shoulder seams and collar. It was then that I realized I should have reversed these steps. The collar is slightly covering the top the embroidery design. If the design had been any bigger, it would have been hidden under the collar.
The next time, I will sew the shoulder seams and attach the collar first and then embroider the design placing it so the collar is not in its way. Then I will attach the pockets last.

 This way I will have no problem hooping the fabric for the embroidering without the pockets on the front, and after embroidering, I can place the pockets over the fabric that was hooped.
The original vest pattern had a bottom band. I liked the look of the band so I decided to keep it on this vest, so I cut the vest and lining 2 inches shorter than the pattern called for to accommodate the bottom band. Because of the bottom band, it was easy to sew the lining to the vest.
With right sides together, I sewed around the vest and lining before sewing the side seams then turned it inside out and sewed the side seams. After a lot of pressing, I sewed the band to the front side of the vest and lining and then folded it to the back and stitched in the ditch to finish up the band.

 The last step was to sew the buttonholes and buttons.
I sewed vertical buttonholes so that my buttonholer would not have to move over the pockets. I don’t believe that vertical buttonholes will make a difference in how the vest wears.
In the end the vest turned out absolutely adorable!
I just love it, and it was so much fun to design and make that I can’t wait to make another one.
I have not given this vest to anyone yet so I do not have a “wear test” to tell me whether a jacket without sleeves makes for an acceptable vest, but it looks good to me.
I could always make the armscye a little bigger on the next vest to ease my mind and the fit.
So until the next time, sew forth and vest on!

 I stopped buying fabric remnants at Walmart a while back now because the remnants at Walmart are only discounted 20% off. When the price of fabric at Walmart used to sell for less, it seemed like the remnants with the 20% off discount was costing very little money at all. So, even if it was a little less or a little more than I needed or not quite enough for what I had in mind for that specific project, it was easy to purchase them anyway.
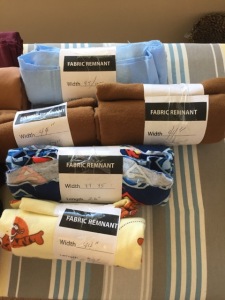
 Now it does matter to me if the remnant is too little, too big, or doesn’t quite match what I had in mind. The illusion of saving more or getting a deal on the remnant pieces just isn’t there anymore, so why not get exactly what you want and need cut directly from the bolt?
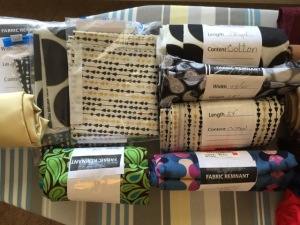
 marked down quite by half and a few were marked down more than a half. Regardless of whether it was more or less, the remnants were a great price and I did not hesitate toss almost all of them from the bin into my cart. I think the only thing I left in the remnant bin were a couple of pieces that I definitely knew I would have no use for, like a small piece of vinyl and some cheap fleece.


 My latest sewing project was destined to be yet another learning experience for me.
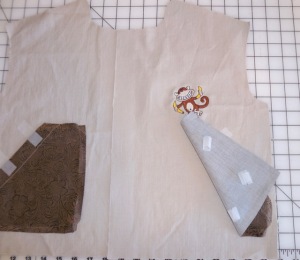
 When I laid out the pattern pieces of Simplicity 8902, on the denim fabric, I remembered that I needed to add an inch to each front for the button overlap. I carefully laid the pattern pieces out correctly to cut the extra inch, but then I promptly cut along the edge of the pattern piece as shown on the pattern and I did not add the extra inch. How dumb was that? Well it was done now and I couldnt undo it so I decided it was a lesson to be learned for the next time I make this pattern.
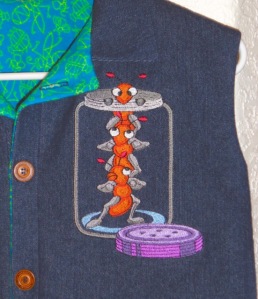 The sewing process started with embroidering the design to the front of the jacket. I remembered that I wanted to do the embroidering first before adding the pockets to keep the pockets out of the way of the embroidery. I also remembered that I wanted to move the embroidery design down so that there would not be an issue with the collar covering some of the design.
 Flustered even more, I now had to come up with a solution to fix the collar/embroidery design problem. I thought about making this vest collarless or adding a standing ribbing collar that would not fold over, but I did not like the look of these options.


