Tag Archive | Stitch

Oh Brother!

I don’t know how old Mom’s serger is but I do know that it is really old, old enough to have knob tensions and be extremely difficult to thread. I also know that it has been giving her fits for years. It has a hard time holding its tensions and the lower looper thread keeps breaking. She has had it in for repairs and service many times, but it just never seem to be fixed or to work correctly especially in the last several years. It was another phone call from Mom one week before Christmas, bemoaning that fact that Christmas was just one week away and that her serger would just not behave so she could get her Christmas sewing finished, that finally prompted me to push Mom again to get a new serger.

Years ago when mom’s serger started to act up, I tried to help her replace her serger. When I looked into the available sergers at that time, I found there were two types, the expensive ones, $2000 to $3000, with all the bells and whistles, and the cheap sergers, $200 to $300, with no features and that barely serged. What happened to a nice $500 to $1000 machine that had just a few features but still serged nicely? At the time, Mom was not sewing as much as she use to, so she did not want to spend a large amount of money on a new serger, so a Singer serger from Walmart was purchased.

Big mistake! The machine was horrible!

It rattled and vibrated and did not serge well at all! It was not long before mom had pushed that serger into the corner and went back to fighting with her old, original serger.

Over the years, I have kept an eye on the big expensive sergers, hoping that one might have that special feature that would make it worth the dollar amount it was demanding. But, I never found one that was worth the price. So, as mom complained about her serger, I did not know what to say. Now, I love my serger so I decided to try and help mom by finding a used serger like mine. After some time looking, I did not find a good used serger similar to mine, but I did find a lot of useful information about sergers.

It seemed that most of the newer more expensive sergers that were purchased were hated, with many owners regretting their purchase and they were trying to rid themselves of their new serger’s on eBay. Most said that because there were so many special features that the machine did not serge well or even perform the special features well. It was a bad case of featuritus. On the other hand, almost all the reviews for the cheap sergers could be summed up to one phrase – piece of crap. So once again, where were that middle of the line sergers?

This time though I found one of those great middle of the line serger’s, the Brother 3234DT. This serger had several great special features, but none that took away from it’s main function, serging.

I told Mom what I had learned and she decided to take a chance and to get one of these new Brother 4 thread with differential feed sergers. When it was unpacked and the owner manual read, I helped Mom thread the serger. It threaded very easily with color coded lay in threading, dial tensions, and even auto needle threaders. I then showed Mom the adjustable stitch length and width, and differential feed like my serger has. Mom was very excited about these features. But, Mom’s new serger had some special features that mine did not. One of these features is the auto needle threader. Another feature that this serger has is a free arm. The table portion of the serger can be removed and there is a free arm for serging cuffs and collars. Man, wouldn’t that be handy while sewing baby sleepers? An extended table also came with this serger. Once again the side is removed and replaced with an extended table that would come in very handy when serging heavy or large items. I was so excited about the extra features of this serger that I thought for a moment about replacing my serger with one of these, but then I decided that there was nothing wrong with my serger and it did not need replacing. (But, if and when my serger does need replacing, I know which serger I will look at first.)

Mom seemed very happy with her purchase. She has sewn a couple of things with her new serger so far and says it serged like a dream. No more nightmares from using that old serger. I am happy that she has a good working serger now and that she can enjoy sewing and serging once again. Plus, along the way I learned a lot about sergers that I did not know before.

So until next time, sew forth and serge on!

Oh! I Want To Make That! Now!

124025535d79d799e41221839803134bThis summer I have suffered from a severe case of “Start”itis.

By definition, Startitis is a condition caused by seeing a new amigurumi crochet pattern and needing to make it NOW despite the fact that the last amigurumi project isn’t even close to being completed.

It is the process of abandoning the current amigurumi project that was being worked on previously, and leaving it as a UFO (unfinished object) to start yet another amigurumi project with the broken promises of later returning to that deserted project as soon as the new one is done, and before yet another new one is started.

My case of Startitis has been quite severe and it is going to take some time to get over at this point.

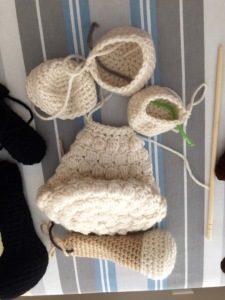
img_5668At the first of the summer, I found the cutest little lamb pattern. I have seen several cute lamb patterns over the years but I had passed on making them because of the challenge of crocheting the lamb’s wool. When I saw this lamb pattern, I was ready to accept img_5689the challenge, and started to crochet the pieces for this lamb. After crocheting the body with popcorn stitches, I needed a break from this project.

The popcorn stitches took a lot of time and concentration to crochet and keep count and I was feeling lazy. This was not a “watch tv” and still crochet project. I tried to crochet the other parts of the lamb that did not have popcorn stitches like the arms and legs, but the thought of the up coming parts with popcorn stitches just made me completely lose interest. I was determined though to see the lamb project through to completion until I spied an amigurumi pattern that I just had to make IMMEDIATELY!

Yes of course, you guessed it!

img_5687It was a ferret in a sweater!

I mean come on, EVERYONE NEEDS one of those don’t they? Boy, I sure thought that I did!

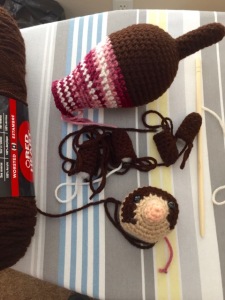
It was love at first sight when I first saw this ferret pattern and it was simple to put down the cream colored yarn of the lamb and pick up the dark brown yarn of the ferret and start on yet another new project. The ferret’s pieces crocheted easily, and I loved adding the little sweater to his body. I crocheted his head and the cut and tied yarn color changed for his little bandit face but then I promptly put my hook down. The problem was, I just saw the cutest momma and baby dragon patterns and I just had to make them both. NOW!

img_5695Since it was so easy to stop working on the lamb project, and start the ferret project, I had no problem at all in deserting the ferret project to start to crochet the dragons instead. I picked out burgundy and gold for the momma dragon and two shades of purple for the baby dragon and then I started crocheting on the momma dragon’s body right away!

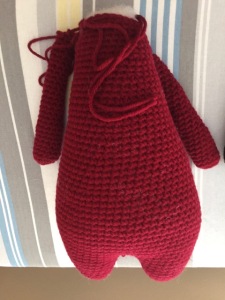
Because I was in such a hurry to start the dragons, I didn’t take the time to read through the pattern first so I was surprised as I crocheted the momma dragon’s body just how big she was going to be, but since the body was turning out really cute I had no problem continuing to crochet on it. I finished the momma dragons body and then I started crocheting the next pieces until I was presented with a new challenge.

Yes, you again guessed correctly. I just had to make a black panther!

img_5693You see, while I was visiting with an old friend, I decided to make her an amigurumi and asked her what her favorite animal was. I was expecting her to say a dog, a cat, a mouse, a cow, a pig, a monkey, or, could I be lucky enough, a lamb, a ferret or a momma dragon, but her response was a black panther instead.

As soon as she named a black panther, I lost total interest in making her an amigurumi for two reasons. One, I have never seen a pattern for a black panther and two, I can’t see black yarn very well so it is more difficult to crochet with than other colors. Crocheting an entire amigurumi from black yarn and getting something that resembled a panther out of it was just too much for my little brain at the time.

But, as time when on and I thought more about it, my little brain started to design a black panther for my friend. This challenge intrigued me so I stopped working on the momma dragon to get the panther started.

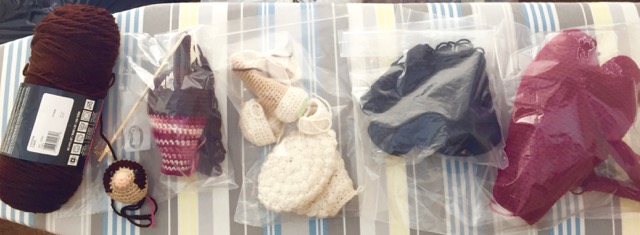
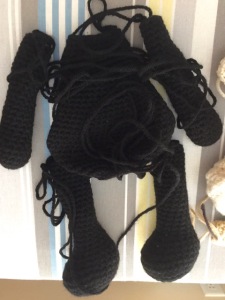
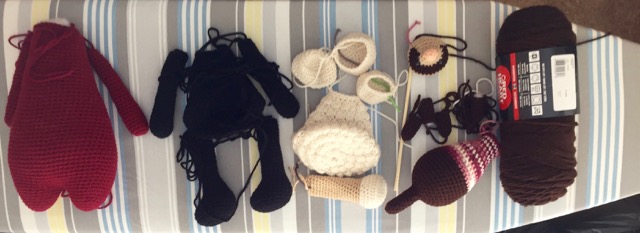
img_5699After crocheting a few pieces of the panther, I put my hook down. Luckily, not to start yet another amigurumi project but to evaluate what I had been doing. So far I had a bag of cream and beige yarn and pieces of a little lamb, a bag with the cute ferret’s pieces ready to be stitched together, a bag with a big momma dragon’s body, and now a bag with black panther’s pieces in it.

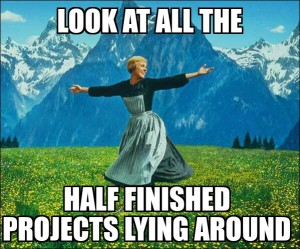
tumblr_nrsok0hg571uawe7no1_1280I decided that I really had to stop this and focus on one project, complete it and move on. These were all projects that I wanted to finish, but I had let new pattern after new pattern get in the way. I could not allow myself to start a new amigurumi project again until I had completed these four that were already started.

So, my new amigurumi project was to pick one of these four current project and compete it. This was a great goal until I realized Halloween is in just six weeks.

Oh crap!

I had wanted to make more candy filled ghosts and spiders for Halloween this year. Now, what do I do? Do I abandon the little lamb, the cute ferret, the momma dragon and now the black panther to start on Halloween projects before it is too late? Stay tuned to see what I decided next time!

Until then, crochet forth and start yet another project before you finish the previous one on!

Girl’s Fleece Jacket (Done Backwards) – Part 2

DSCN2088When I started this jacket, I decided to go ahead add the optional cuffs to the sleeves.

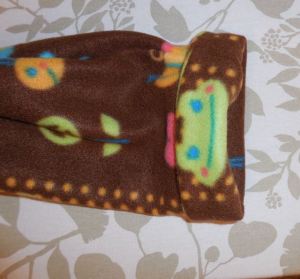
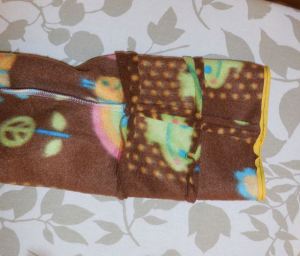
The cuffs looked so cute on the jacket on the pattern envelope, that I wanted this jacket to have the cuffs. But when it came time to sew the cuffs on, they were not turning out very well. They were just too bulky. The cuffs are made from two pieces of fleece. The first piece is sewn to the sleeve, then the next piece is sewn to the first piece and then folded over to make the cuff. I cut out the cuffs, sewed the cuffs to the sleeves and then removed the cuffs. In my opinion, this was a bad design for a fleece cuff due to so many seams in the cuffs and the bulkiness these seams caused. There are four layers of fleece in the top seam of the cuff, and that is just too many layers of fleece.

DSCN2084If I wanted to keep the cuffs, I had to come with a solution, so I gave it some thought and came up with some ideas.

First, the sleeves could be cut longer to make the cuffs. This would eliminating the bulky seams, but I had not cut my sleeves longer so this solution was out for this particular jacket. Another solution would be to use a thin lining fabric as part of the DSCN2086cuff, but I did not have it in me to dig through the stash to find a matching fabric. My third solution was to skip the cuffs, and make more bias tape. I would finish the edges of the sleeves with yellow bias tape to match the pockets. (My first thought was to use the bias tape to finish the edge of the cuffs, but eliminating only one of the layers in the bulky cuff was not enough.) So, I choose this as my plan. This jacket would not have cuffs, and I would finish the sleeves edges with the yellow bias tape.

Thinking back, I could have had cuffs on this jacket by combining the solutions. I could have used a lining fabric and the bias tape to make the cuffs and eliminate the bulk. Hmmm. Maybe I will try that on the next jacket.

DSCN3414By using the bias tape on the sleeves, I did not have to worry about a hem or the fact I had not cut the sleeves longer to accommodate a hem. I applied the bias tape to the edges of the sleeves, trimmed the seams and turned the bias tape to finish the seams. I noticed that the thin bias tape looked weak at the bottom of the heavy sleeves. The way I got rid of this weak look was to not trim the seam inside the bias tape so much, which was different from any other time I have applied bias tape. Previously, when I applied bias tape, I wanted the seam allowance trimmed out before folding the tape over. If the seam allowance was left inside the bias tape this time, the look was much fuller and it looked better.

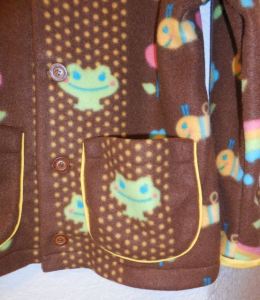
DSCN3418It was now decision time. Which way did I want the jacket to cross, left over right or right over left? After a lot of thought and debating, I decided to cross the fronts as if it were a boy’s jacket, the left front on top of the right front. This will probably drive the little girl that wears this jacket nuts as she tries to button the jacket backwards, but the half froggy’s that I got from folding the jacket the other way just didn’t look good. Hopefully whoever wears this jacket won’t mind the backwards buttoning buttons if it is a girl.

I was dreading making the buttonholes on this jacket. I was not sure how my sewing machine would handle sewing buttonholes on fleece. Sometimes, even with thin non-stretch fabric, my sewing machine has a mind of its own when it comes to making buttonholes and sews whatever it wants to. To help combat this problem, I made horizontal buttonholes, and held my breath as the buttonholes were sewn, but my sewing machine did great and the buttonholes turned out just fine.

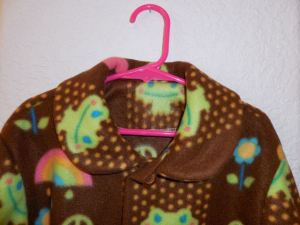
DSCN3413If I had known then, at the beginning of the sewing of this jacket, what I know now, nearing the end of the sewing of the jacket, I would have added piping to the peter pan collar to coordinate with the finished design of jacket. It would have been really cute to have had the bright yellow piping around the collar to match the piping on the pockets and the bias tape on the sleeve. This is definitely something I will keep in mind for the next jacket.

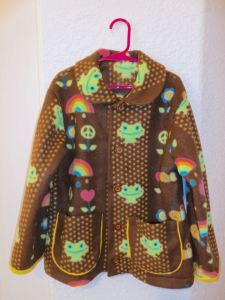
DSCN3416With the sewing on of the last button, the jacket was finally done!

The making of this jacket was a learning experience from the beginning to the end, from the cutting of the fleece, to the sewing of a back facing, to the piping curved pockets to the designing of the fleece cuffs. There were many lessons learned on this fleece jacket.

All in all, I think the jacket is very cute and I hope some little girl will be willing to wear it and will enjoy it!

Until next time, sew forth and fleece on!

Girl’s Fleece Jacket (Done Backwards) – Part 1

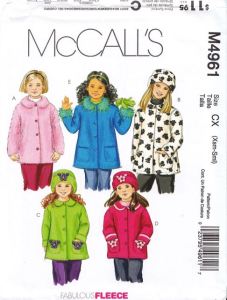
DSCN3413Over the years, I have accumulated a massive amount of polar fleece in the stash. At first, these fleeces were only purchased with blankets in mind, but over time, my ideas for fleece fabric has expanded. So, when I saw this pattern, McCalls M4981, especially designed to be made from fleece, I knew what I wanted to sew next.

IMG_0002 (2)M4961 is a pattern for a girl’s unlined fleece jacket with a peter pan collar, patch pockets and buttons closures. I was excited to get started, but I quickly learned that this project was not going to be an easy sew or a fast sew.

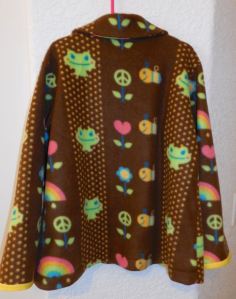
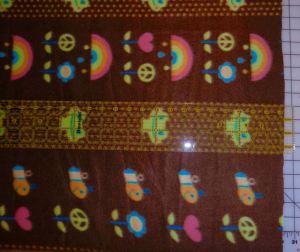
To start, I selected a piece of fleece from the stash. I chose this cute girl’s design of froggy’s, bees and rainbows on a brown background. I did not have to launder the fabric before I got started since their was no preshrinking needed with this fleece. I traced the pattern, size 6, and got started with the cutting process.

DSCN2575Cutting out this jacket was not an easy or quick task. The print on this fleece was so far off grain that it was almost impossible to cut the pieces so the froggy’s and rainbows were standing up straight. I pulled the fabric and repositioned the pattern pieces until I finally got the pieces cut out. When I finally finished the cutting process, I realized I had lined up the right and left front backwards from each other.

DSCN2572When I folded the right front over the left front for a girl, I got a nice froggy edge on the right side and half of a froggy edge on the left side, but if I folded the front as you would for a boy, left front on top of the right front, then I had a nice froggy front. So, should I have a poor looking front with half froggy’s and cross the jacket for a girl or have a nice looking front and cross the jacket for a boy? That was the question. This question did not have to be answered right away so I decided to move on.

DSCN3411I did add some thin interfacing to the facings and the collar. The husband thought I was crazy for adding more bulk to the fleece, but I explained to him that was why I was using such thin interfacing. I just wanted something to stabilize the fleece at those spots and keep it from stretching while sewing, particularly when it came time for buttons and buttonholes.

DSCN2074To start the sewing process, I did not read the pattern guide at all. Looking at the pattern pieces, the sewing of this jacket seemed pretty straight forward, So, I just got started. Who needs directions anyway? Am I right? I sewed and pressed the collar, serged the facings edges, folded them over and sewed the facings to the collar. Normally, my next step would be to sew a piece of twill tape to the collars inside edge to finish it and then tacked the facings to the shoulder seams. This pattern has a back facing as well though, and I stopped for a moment as I pondered how I was supposed to sew it on. I then turned to the pattern guide and read that sewing the back facing to the side facings should have been the first step before adding the collar.

Too late now!

DSCN3410I was certainly not unpicking all my sewing that I had done up to this point. My first instinct was to grab my twill tape and just throw away the back facing but then I came up with plan to attach the back facing. After some tedious sewing, I got the back facing sewn on, only to find out that I had sewn it on backwards. The wrong side of the fleece was facing out. Augh! There was no way I was unpicked the back facing just to flip it over. It would just remain backwards. Sometimes, just when you think you know it all, and you certainly know better than some pattern maker and you get ahead of yourself, you find out too late just how wrong you are…

DSCN2080When it came time to sew the pockets, I debated about how to get nice smooth curved pockets since the use of the iron was of limited use with the fleece. I had read about using piping to help curve the pockets so I decided to give it a try. I cut bias strips from yellow cotton scraps and made the piping for the pockets. When it came to sewing the piping to the pocket, I was having trouble starting the bias tape in the fold of the pocket because of the bulk of the fleece. I turned to some liquid stitch for help. I folded the yellow fabric over the top of the cording in the piping and glued it down with the liquid stitch. This gave me a finish at the top of my piping so I did not have to keep tucking it into the fold. I did the same thing at the other end of piping on the other side of the pocket.

DSCN3409I don’t know if I really like the look of the piping at the top of the pockets done this way but it is fine for this time. I think I need to read more on how to start and stop the piping on pockets. The piping did do its job and it helped to curve the edges of the pockets and hold the curve in place as I stitched the pockets on.

Plus, it looks really cute and makes the pockets stand out from the rest of the jacket.

There is a lot more to say about the sewing of this jacket but I’m going to stop here and give you a break from the long list of lessons I was learning on this project. Stay tuned for the finale of this backwards jacket next time!

Until then, sew forth and fleece on!

Sammy the Seal

DSCN2357DSCN2358It didn’t last long, but then it never does.

I broke my current crocheting criteria of only making patterns that I have had for a while, but that I could never seem to get made. The minute I saw this new pattern for this seal, I knew that I wanted to make it and it became my next project.

Even though I have piles of old patterns that I have been trying to get around to making, for some reason I just wanted to make this one instead and so I did.

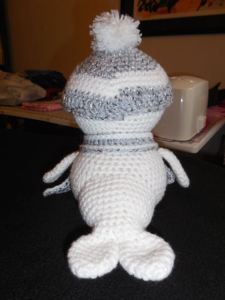
The pieces for the seal crocheted up without any problems and I enjoyed the process. The pattern was well written and easy to follow. The stuffing and stitching together of the pieces went smoothly as well. It was a little odd for me to not stuff the flippers of the tail but to put stuffing in the tail portion only. I thought about stitching a line between the tail and the flippers just to keep the stuffing in the right spots, but the stuffing seemed to stay where it was suppose to, so I did not stitch the line. The seal’s nose and mouth were easy to design but his whiskers took some work to get just right. The pattern had 3 big long whiskers but in the end I liked my 2 short whiskers better.

DSCN2340DSCN2155When it came time to crochet the hat and scarf, I had a little trepidation. The seal had been turning out so cute without the hat and scarf, so why go to the trouble of making them? But, as I looked at the pictures in the pattern, the hat and scarf added to the seal’s cuteness, so I decided to get crocheting and get them made too.

The hat was easy to crochet. It was crocheted in rounds just a little bit larger than the head with double crochets for the last round to give it an edge. When it came time to make the pompom for the top of the hat, I had to have the husband help again. I could not get the knot tight enough to keep the yarns from just falling out of the pompom. The husband was able to tie the knot tight enough and the pompom came out really cute. My hat is a little squarish. If and when I make another hat, I will vary the increases in the round to keep it a little more rounded.

DSCN2335DSCN2285I liked the scarf that I made for the Hello Kitty so much that I decided to make the seal’s scarf the same way instead of following the pattern for it. I made a chain of yarn to the desired length, then double crocheted back to the other end. Next, I changed to the white yarn and slip stitched around the double crochets and chains. I was concerned about how the back of the scarf would look in the places where it would be seen when the scarf was tied to the seals neck, but the tied on scarf looks great.

I used a dab of clear fingernail polish on the yarn ends of the hat and scarf to finish them off. The nail polish will seal the ends so that if this seal is played with, there will not be any yarn ends coming loose. I thought about stitching the hat and scarf to the seal but then I decided that if the seal is being played with, that being able to remove the hat and scarf might be more fun for someone.

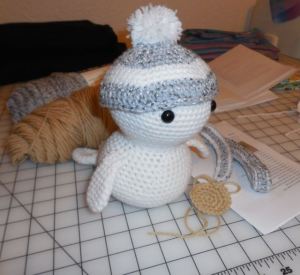
DSCN2184DSCN2158This seal was a fun and quick project that turned out so very cute. It was easy to pick the name Sammy for this seal. What else would you name a seal? With Sammy the Seal completed, I will again return to my crocheting criteria of picking my next project from patterns I have been longing to make. Unless another more fun pattern pops up first that is!

Until then, crochet forth and seal on!

Being Biased – Part 3 – Button Fitting

DSCN1300I believe I have fallen in love with bias tape.

Even though, I had a number of trial and tribulations in the making of and the sewing on of the bias tape with these tops, I can see were bias tape can be a fun accent to many sewing projects and I can’t wait to start another bias tape project.

But before I do that I needed to finish these cross back summer tops before the summer has ended so that the girls can actually get some use out of them.

All I needed to do to finish them was to add buttons and buttonholes to the back of the tops and they would be done and ready to wear.

Sounds easy enough, doesn’t it? Well, I wish would have been as easy as it sounded.

DSCN1303I knew when I cut this pattern out that this pattern does not have a true side seam. I did not think it was going to be a big deal, but it was!

The backs are cut so that the shoulder and side seams are towards the front of the top. There is no seam directly under the armscye or on the shoulder. It is just to the side of the armscye and front of the shoulder.

This pattern also has no indication of where the buttonholes should be placed. So, when it came time for me to determine where to sew the buttonholes and buttons, I had some guessing to do. DSCN1304

I started the guessing by trying to determine where the true side seam would have been on these tops. Should the back come towards the front of the top a little, like 1/2 inch, or a lot, like 2 inches.

Next, I had to determine if the cross over should match at the top and leave a big “V” at the bottom of the back or should the “V” of the cross over be smaller by lowering the top. I spent hours measuring, folding, pinning, and deciding where to put the buttons and buttonholes.

I would think that I had it all ready to sew, then I decided that it wasn’t right and I would start again. After awhile even the husband grew tired of me showing him each variation that I tried. He tried to help, but I just could not make up my mind if I had it right or not. DSCN1302

Finally, I reached a point were I truly believed that I had it measured, folded and pinned where I wanted the buttons to be so I went to the sewing machine. I carefully sewed the buttonholes and buttons in place on both tops.

When I was done, I was quite pleased with myself until I held the tops up and the back curve of the cross over flopped down over one of the special buttons I had paid a lot of money for. Crap! The buttons needed to be higher on the top.

Now, how was I going to fix this? Version 2

My first thought to solve this problem was to sew a hook and eye to the curve which would attach the curve to the back of the top. This would keep the curve from flopping over but that did not work. When the curve tried to flop over, you could see the hook and eye and it looked worse than the flopping curve of the fabric.

My next thought was to use some velcro. As I went to sew the velcro on, the husband asked what I was doing. I showed him the flopping curve and how I was trying to fix it. He said to stop. He said that since girls were sisters they could keep an eye on each other’s backs when they were wearing the tops and if the curve flopped, they could fold a crease in the bias tape so that the curve would not flop as much. This seemed like a reasonable solution to the flopping curve, so I left it at that.

20150530_124144The REAL answer to this whole problem was to have the girls try the tops on before I placed the buttons.

I could have quickly determined where the “side” and “shoulder” seams should be, how big the “V” in the back should be and where the buttons needed to be. But, I had wanted the tops to be a surprise for them so I didn’t. Even though they had picked out the fabric, they did not know what I was making from it. Plus, with them not knowing what or when I was making something, there was less pressure to get the tops completed.

With that all in mind, I determined that the surprise and less pressure to get the items completed were not worth the button/buttonhole headache, and with this lesson learned, the next time I make something for the girls, there will be fittings during the process. Version 2

Upon receiving the tops, their mom says the girls like them and will wear them. I explained to their mom the button/floppy curve issue and she said it would not be a problem.

I don’t believe that the girls were nearly as excited about these tops as they were their fun vests or their Dr Who bags, but that is ok because I learned a lot from these tops both in the sewing process itself and in the process of sewing for others. 20150530_124000

And the next time I sew for the girls, I am getting them involved in the process.

No more surprises!

I want them to pick their own fabrics, colors and styles. I want to measure them so that I have the best fit, instead of using a year old measurement that their mom took (no offense to their mom), and I want fittings and alterations done during the sewing process.

I think I will learn even more sewing for them this way and they will have exactly what they want as well. Plus NO more guessing!

Until then, sew forth and bias tape on!

Being Biased – Part 2 – The Sewing of the Bias Tape

DSCN1308I gave the process of sewing of the crossed back summer tops a lot of thought before I made the first seam.

I had read the pattern instructions, but I wanted to sew the top together with fitting in mind. I wanted to sew the seams so that the minimal amount of unpicking would be necessary if I needed to alter the size of the tops for the girls later. So, my plan was to start with sewing on the bias tape before sewing the shoulder seams or the side seams. After the bias tape was sewn on, I would sew the bias tape together with the shoulder and side seams as one single seam. That way if I had to alter the shoulder seams or the sides seams of the top, I only had to unpick a little bit of bias tape to get to the seams. This was a great plan until I thought about how I wanted to sew the bias tape on.

DSCN1298In deciding how I wanted to sew the bias tape on, did I want to sew the tape to the right side of the fabric and then fold it to the wrong side and stitch in the ditch on the front so that no seams were showing? Or, did I want to sew the tape to the wrong side and fold it to the right side and then stitch the tape with a decorated thread or stitch?

Since I was already mixing colors by using the pink bias tape on the purple top and visa versa, I choose the second option for sewing the bias tape on. So, my final sewing plan went as follows: I would sew the bias tape to the wrong side of the fabric and would then fold the tape to the right side after sewing the bias tape together with the shoulder and side seams. I would then top stitch the tape with the opposite color thread, i.e. sew the purple bias tape on with pink thread and visa versa. Sounds like a solid plan, right?

Well, this did not work as planned.

DSCN1295Because of how I had sewed the bias tape on, when I folded it to the right side the bias tape was needed to be sewed together opposite of the shoulder and side seams. If I had sewn the bias tape the other way that I had thought about doing it and folded it to the wrong side, my seams would have worked. But, instead of my plan working, I got to unpick several inches of each piece of the bias tape so that I could sew the bias tape together, then I could sew the shoulder and side seams together and then sew the bias tape back in place on the wrong side. Finally, I could fold the bias tape to the front and do the top stitching. All these little seams were flustering and extremely time consuming to sew and lets face it, not a lot of fun to do! But, I finally got it done and I had completed the sewing of the first top.

DSCN1306I wanted to sew the second top with the bias tape folding the same way as the first so I returned to the pattern’s instructions. I started by sewing the shoulder and side seams together first and then I sewed the bias tape on the wrong side of the top. Next I folded the tape to the right side and then top stitched the tape on. This went much faster and easier than the sewing of the first top had with no little seams to deal with. An with that the second tops sewing was complete.

I had four opportunities to learn the best way to start and stop the bias tape. I tried several ways but the way that folded and stitched the best for me was to leave a small piece of bias tape unstitched where I started. When I reached the end of the seam for the bias tape, I folded the ending piece of bias tape back on itself. I then laid the starting unstitched piece on top of the folded ending piece and then sewed this in place. When I folded the bias tape over, the starting pieces folded into the folded ending piece to make a finished start and stop of the bias tape.

DSCN1313The idea of sewing the bias tape to the wrong side of the top and then folding the bias tape to the front and top stitching in a contrasting thread sounded great, but in reality, sewing the bias tape on the right side and folding it to the back and stitching in the ditch with a matching thread would have hid a lot of sewing sins.

The top stitching looks good for the most part, but anywhere were my seams were not exactly straight, the contrasting thread announces the wavy seam LOUDLY. Also the starting and stopping of the seams don’t look that good. This is especially true where I was learning how I wanted to start and stop the bias tape.

DSCN1299The sewing of the tops would have been a lot easier and cleaner if I had sewn the bias tape the other way, sewn to right side and then folded to the back. I also could have followed my fitting plan. But, I had sewn the bias tape the other way and many lessons were learned, so it made the whole experience a good thing. Plus, the tops were looking good with the contrasting colors and threads. So, with the tops sewn, it was time to add on the buttons and buttonholes.

Join me next time to see how they turned out once they were completed!

Until then, sew forth and bias tape on!

Being Biased – Part 1 -The Making of the Bias Tape

IMG_1621My coworker’s tween girls are using and enjoying their Dr Who bags and it does my heart good for someone to enjoy and use something that I have made.

So much so, that it was easy to find another pattern to sew for them next. This time I made them a summer crossed back top from some sugar skull fabric that they picked out. I found this crossed back top pattern on line for free. It looked like a fun summer shirt, easy enough to sew and the right size for the girls.

I gave the girls their choice of a couple of fabrics that I had in the stash and they both picked the sugar skull fabric. I did not have enough sugar skull fabric to made both shirts so I planned to piece the tops with some black fabric from the stash.

Then I thought about it being summer. DSCN1296These were summer tops made to be worn in the heat of the summer months, so how could I make them from black fabric? So I dug through the stash and I found some nice pink and purple that would match the sugar skull fabric.

I decided to make one top from the pink and one from the purple so the girls would not have to match. I know that teens are image concious that way. The pattern is only two pieces, a front and a back, cut twice. Based on the girls measurements, I cut the front and back 1/4 inch wider and 1 inch longer than the pattern called for. The pattern also called for 3 yards of 1/2 inch double folded bias tape. I

f I had been making the tops with the black fabric, I would have bought the needed bias tape, but since I was using the pink and purple fabric, I decided to make the bias tape. 61NeRAwqLEL._SY450_Then I had the idea of using the pink bias tape on the purple shirt and the purple bias tape on the pink shirt to give them some great contrast, so I would definitely be making the bias tape myself. Plus, it would give me the opportunity to make bias tape again, and as you know practice makes perfect and I don’t use bias tape all that often.

Now, I thought I had the process down for making bias tape from the last time I made it for another project, but I was incorrect. I had a lot to learn and relearn while making this bias tape. I started out by cutting 1 inch strips on the bias. When it came time to sew the bias strips together, I knew that they needed to be sewn at a 90 degree angle, but I kept sewing the strips together backwards, one seam up and then one seam down. After much trial and error, I figured out that I needed to sew one strip on top, then the next strip on bottom to keep all the seams all on one side. 71f-MxnZmTL._SY450_

After getting all the bias strips sewn together correctly, I started to iron and shape them. I used my 1/2 bias tape maker and was making some beautiful bias tape, when I realized that my bias tape was only single fold.

What? Darn! I needed double folded bias tape!

So I folded my beautiful 1/2 single fold bias tape in half and got 1/4 inch double folded bias tape, half the size of what I needed. Crap! I seriously thought about just using the 1/4 inch double fold bias tape that I had made but I decided against it and started all over again.

This time, I cut 2 inch strips on the bias, sewing them together correctly as I had learned to do earlier, and I prepared to iron again, but not until I purchased a one inch bias tape maker.

Looking on Amazon for bias tape makers, I found two types, Singer brand made completely from metal, and several third party brands made of metal with a plastic insert.

Which was better? DSCN1310

After reading many reviews and pondering the question, the husband rolled his eyes and ordered me both the Singer and another brand with the plastic inserts. After trying both styles of bias tape maker, I decided to use the Singer metal ones. Even though both worked fine, I just liked the Singer ones better. They seem to fold the fabric more evenly and were easier to push the fabric into the maker when starting out.

After a fair amount of ironing, I had 4 yards of 1/2 inch double folded bias tape in both pink and purple, ready to sew on. I made 4 yards of each color rather than 3 yards like the pattern called for because I had increased the size of the tops slightly from what the pattern called for.

Now it was time to sew the bias tape on to the tops.

Stay tuned for the construction of the crossed back summer tops in my next post!

Until then, sew forth and bias tape on!

What About The Scraps? – Part One

DSCN2070I just love fabric! I love to hold it and feel it and measure it and imagine all the fun items that it could be made into. Then, I just love to fold it and hoard it in my stash until that special day when it finally is retrieved and made into something fun!

And that brings me to the age old question of “what to do with the scraps?”

After a project, should I fold up the scraps and return them to the stash or should they make their way to the donation box or the garbage? When I first started sewing, I saved every scrap, but over the years as the stash has grown in size, I have been more able to let go of and part with my scraps.

DSCN2071Now days, I evaluate my scraps based on a ranking system of importance.

1. Are there enough scraps left to make something with?

2. Did I enjoy working with the fabric?

3. How did the item wear when made from the fabric?

It was this evaluation that started my next sewing projects. DSCN2068

Left sitting on the cutting table were the scraps from my last few projects. I needed to clean off the table before I could cut out another project, so it was time to evaluate the scraps.

Large scraps were easily folded and returned back to the stash, but a couple of pieces were just not quite big enough to return to the stash. The first of these pieces was the scraps of purple and white knit left over from my last shirt.

The scraps were big enough to make something, so I did not want to just throw them away, and I enjoyed sewing with this fabric, plus my shirt has worn well, so I grabbed my Kwik-Sew books and I determined that I had enough scraps for a size 2 t-shirt with long sleeves. DSCN2072I already had the pattern traced, and in no time I had the pieces cut out and I was sewing them up.

To add a little something to this shirt, I top stitched the shoulder and sleeve seams. After sewing and serging these seams, I simple sewed the seam down from the top side of the shirt.

Looking at the results, I wish I had lengthened my stitches so it looked more decorative. I will do that next time. That was a good lesson learned.

IDSCN2069t was not hard to pick the Snoopy and Woodstock embroidery design for this little shirt. I worried that the embroidery design would be lost in the shell design of the shirt, but it did not once I had it stitched up. I think the embroidery design looks very cute and that it can easily be seen.

This little shirt was a fun and fast sewing project with fun results, plus the scraps were put to good use.

Hopefully, some little girl will enjoy wearing the shirt.

Stay tuned for the next scrap heap sewing project coming up soon.

Until then, sew forth and scrap on!

Simplicity 2480 – The Jacket – Part 4

DSCN0984With the pockets now completed, it was finally time to stitch the jacket! The first step was to insert the zipper. Remembering the lessons that I had learned from inserting the zipper in the little girl’s peplum jacket, this zipper sewed in much easier. And I did not need to move the needle over to sew the zipper on like I did the last time. The only challenge I faced with this zipper was deciding just how long I wanted the zipper to be.

Did I want it to extend into the collar or stop just before the collar? DSCN0807

The pattern called for the zipper to be inserted into the collar, but If I stopped the zipper at the collar, I could attach the collar as I would the collar of a camp shirt, finishing it off with a little twill tape.

If I followed the pattern instead and inserted the zipper into the collar, some hand stitching would be required to finish the collar. Now, you know how much I just “love” hand stitching, so you can guess which plan I was leaning towards, but then I remembered that I was making this jacket to learn so I decided to follow the pattern and insert the zipper into the collar, and then do the required hand stitching. After sewing on the zipper and facings, I hand stitched the edge of the collar to the back of the jacket. This went a lot smoother than I expected it to. I think I did a pretty good job on the hand stitching and that it will hold up with wearing.

Now that it is done I am pleased with the results of how I attached the zipper, collar and facings. DSCN0737Before I started this pattern, I read some pattern reviews for this pattern on the internet and one of the things mentioned about this pattern was that the sleeves were extremely wide. I could see this as I traced the sleeve part of the pattern, so I decided, based on the size of my wrists, to grade 4 inches out of the the width of the sleeves starting at the wrist.

I think the wearer of this jacket will like the thinner sleeves and it saved on fabric. I inserted the elastic at the bottom of the sleeves as the pattern called for. I think that will also help with any extra blousing from the wide sleeves. DSCN0989I interfaced the facings and collar before sewing them on. I just grabbed the first interfacing that I pulled from the stash to use, but I wished later that I would have looked a little closer.

Now, with the interfacing applied and the jacket sewn up, the interfacing that I used is too heavy for the fleece. The heavy interfacing makes the collar stiff so that it only wants to stand up. The heavy interfacing is also a problem at the inseam pockets. Because I used two pieces of fleece to make the pockets, they are already bulky but when I added the heavily interfaced facing on top of the pockets at the bottom of the jacket by the zipper, it is even bulkier.

Lesson learned. DSCN0987

Upon completion, I stared at the jacket and it looked very odd to me. It looked like it would never fit anyone.

It’s was so small in circumference but long in length in both the sleeves and the body of the jacket. Who would have such odd body proportions. Then it dawned on me what I had done. I had made a extra small adult jacket, and not an extra large child’s jacket. Once I figured this out I could finally picture a young slender adult wearing this jacket without any problem. An unforeseen lesson in sizing and fit was learned this time around. Although this jacket may not be perfect, and some of the seams are not very straight, I am still pleased with the end results.

I learned a lot, and it has left me with several ideas and sewing techniques that I want to try and work on in the future. I hope some one will enjoy wearing this jacket and that it will fit them well.

Until next time, sew forth and jacket on!