 This dress is just too cute with the two matching fabrics, the buttons down the front, the gathered pockets and the little shorts. This little dress is a great design. A little girl can look so cute and proper for school with the buttons all buttoned up and then she can unbutton those buttons to reveal the little shorts to then ride her bike or run around the playground. It is the perfect tom boy dress in my opinion, and I could not wait to make it. The pattern front said that it was easy to sew, further encouraging me to get started right away. But, the pattern description was a little white lie. I quickly learned that for me this little dress was going to be a long and involved sewing project.
Picking the main fabric with the pink and white check pattern was easy. This fabric was purchased with the fabric I used to make the bubble top of my last post so many years ago, but this piece was actual yardage and not just large scrap pieces. One nice thing about this fabric was that it came out of the washer and dryer without too many wrinkles. I did have to make a trip to Joann’s to get the accent pink for the trim as I did not have that on hand.

 I traced the size 6 from the pattern and after tracing the bodice and skirt, I noticed there were still many more pieces left to trace due to all the trim and tie pieces. This was not a problem, but it took extra time to trace and cut out of the pattern pieces, and then to cut out the dress from the fabric. Once I had done this my excitement to make this dress had not waned, so I was willing to put the extra time. Since there was not a direction to the design of this fabric, I put a little piece of tape at the bottom of the skirt pieces as I cut them so I could later identify the top from bottom on them.
The next thing I did was read the pattern guide twice before taking my first stitch. After seeing the number of pattern pieces for this dress and reading the pattern guide, I knew this was not going to be the easy or quick sew like the pattern cover had claimed it was going to be, but I decided there was a lot to learn from making this dress and it would still be fun to make. I followed the pattern guide closely as I stitched the trim and ties to the bodice pieces and then stitched the bodice pieces together. The upside down “L” trim pieces on the front of the bodice were tricky to stitch. I did an ok job on them, but I learned a lot and would probably do a better job next time.
 Next up were the pockets. I will be the first to admit that I need more practice when making pockets, the shaping and styling of pockets as well as just making different types of pockets. I knew this fact as I started these pockets, but I was still willing to give it my best. If the pockets did not work out, I could just leave them off so there wasn’t any fear of messing them up. Still following the pattern guide, I made the casing for the elastic at the top of the pockets and inserted it. Still no problems had arisen so I continued on. Next came ironing the edges so that the pockets could be top stitched on. This was not working well at all. As I stopped to think about it, I decided I needed to gather the pockets to help get the round shape I wanted from them, much like you gather a sleeve cap when inserting a fitted sleeve. The gathers would not show on top of the pocket but it would be in the seam to help ease the curve.
 Because I only needed a small amount of gathers to round the pockets, I decided to use the serger method of gathering that I had read about recently. Using this method would take care of two steps. If I serged around the pockets, not only could I use the serger to make the needed gathers, it would also finish off the edges of the elastic at the top of the pockets. After serging the edges of the pockets, I found the needle threads of the serging at the curves and pulled them. This gathered the fabric together. I was then able to iron the curved edges so I could top stitch the pockets on. This left the serging messy with loops but I just tucked the loops into the seam as I stitched the pocket on. The serged gathers worked nicely for rounding the pockets and I think the pockets look pretty good. I still need more practice, of course but these pockets turned out well enough to leave them on the dress.
 The next step I did of sewing the skirt and trim went smoothly. I used the floss method for gathering the skirt, then sewed it to the bodice, and then added the lining. The step after that is where I varied from the pattern guide. Before finishing the lining, the guide called for a fitting of the dress and adjusting the straps to the needed length, then stitching the straps in place and finishing the lining. Since I had no idea of what length the straps needed to be, I decided not to stitch the straps in at this time. I would instead attach the straps in the next step
 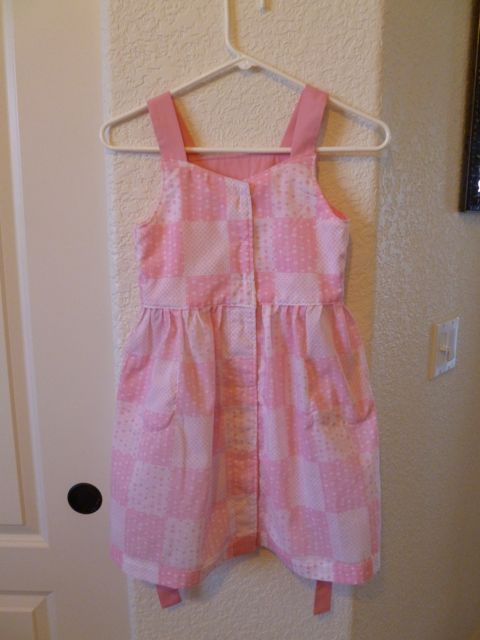 with the top stitching of the trim. This way, if the straps needed to be adjusted once it was tried on, only the top stitching has to be undone and not the lining finish and the seams inside where the straps are attached. I finished the lining’s stitch in the ditch seam with a little help from some seam to seam adhesive. Because the lining of the skirt was made from the main fabric and not a slippery lining fabric, the stitch in the ditch seam sewed rather smoothly and nicely. Unlike the last skirt I made, I did not have to go back and restitch any places this time. The final steps to complete this dress were the top stitching of the trim where I stitched the straps into place and then the hem and the dress was done.
 The shorts were next in line to stitch. The shorts pattern was very basic, just 4 pieces in total with two front pieces, two back pieces and an elastic waist with no pockets. I believe that all kids clothes need pockets, so I debated if I wanted to add patch pockets or side seams pockets to these shorts. I finally decided on no pockets. These shorts would be better if they were straight and flat without the added bulk of pockets. This way they would be less obvious under the dress when it was being worn buttoned up fully. Yet I still wanted to add something to the shorts to give them a little flair, so I decided to add a little slit at the side seams. I finished the side seams flat before sewing the seam together. I then sewed the side seams stoping two inches before the bottom of the shorts. Next, I hemmed the shorts. This formed the slits on the side. I then stitched around
  the slits to finish up this added detail. The slits were easy to make and added a nice touch to the simple shorts. I made the shorts in white even though that is not a great color for a little girl to play in but the denim fabric I used is very durable and washes well. I am also hoping that the shorts can be universally worn, either with this dress or with the bubble top I previously made or anything else as well.
I feel that this completed dress and shorts set turned out great! I think it is a very cute outfit and will be fun for a little girl to wear. I learned a lot on the construction of this dress and I had a chance to practice pockets, top stitching and stitching in the ditch. I am happy that I stuck with it and endured to the end with this project. It might not have been an easy project like the pattern stated but it was worth the work in the end.
